# 快速入门
这里将介绍如何下载并启动前后端工程,主要介绍后端Spring Boot工程引入Fly框架后对于不同模块的入门使用。
# 环境准备
在开始之前,我们需要先做如下准备,以满足工程基本的运行条件:
- JDK (opens new window) 建议使用 8 或 11;
- Maven (opens new window) 3.0 版本及以上;
- 集成开发环境(
IDE),常见的开发工具有 IntelliJ IDEA、Visual Studio Code 和 Eclipse。
编写示例时,所用的环境为 JDK 1.8.0_231,Maven3.6.3 以及 IntelliJ IDEA,仅作参考。
# 下载工程
Openfuse提供了在线构建工具下载中心 (opens new window),在里面可以快速构建并预览下载多种模板工程,若你已有Spring Boot工程只需要引入Fly,可以跳过本小节。
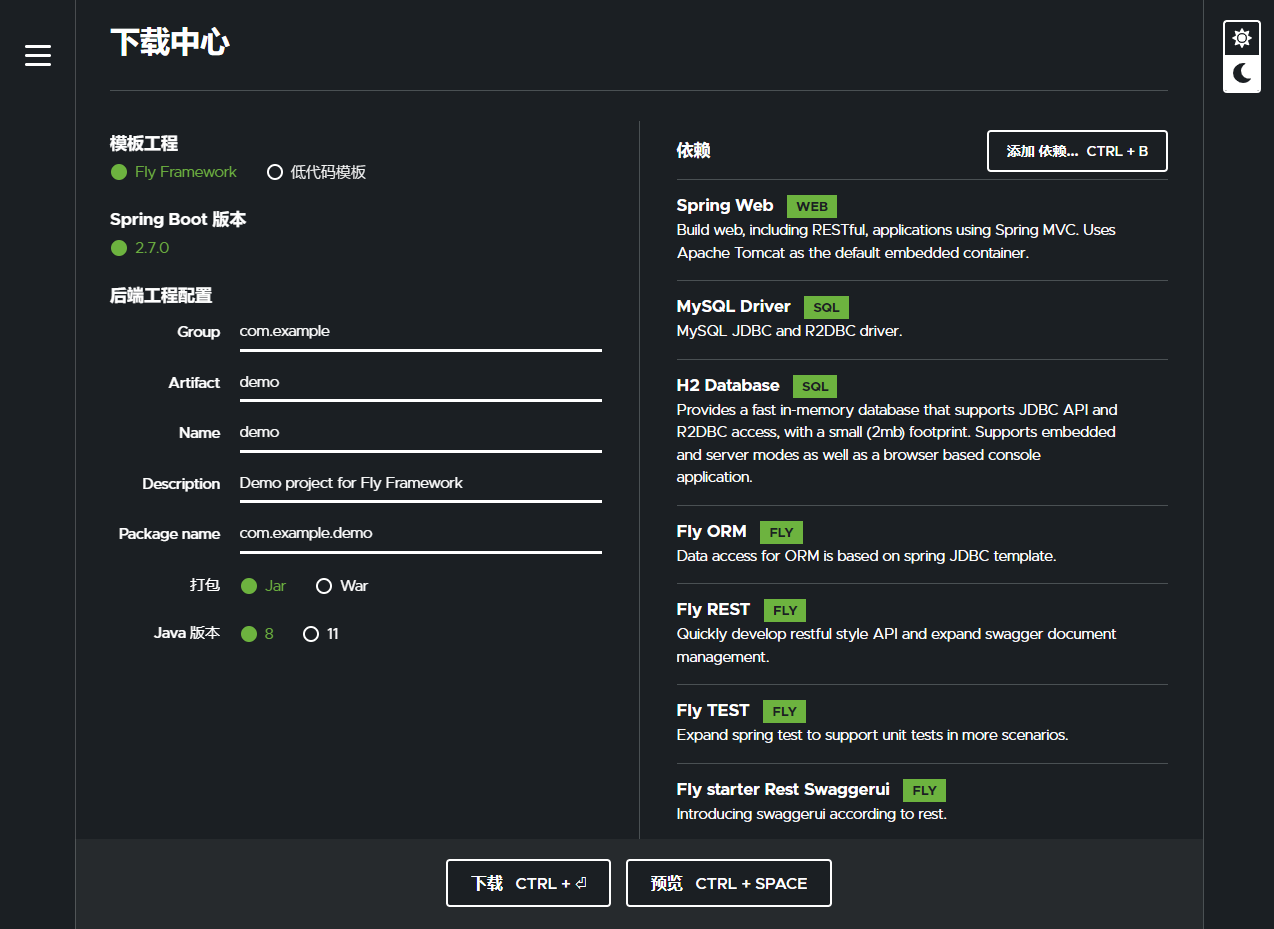
【模板工程】
Fly Framework模板只包含了后端API工程,Fly Framwork + UI模板则同时包括基于Fly-vue (opens new window)的前端WEB工程,可以点击下方的预览按钮查看两者的区别。
【Spring Boot版本】
Fly推荐使用及兼容的版本列表。
【后端工程配置】
Maven工程的基础配置。
【依赖】
用于调整后端工程所包含的依赖,当选择了Fly部分模块如Fly ORM、Fly REST和Fly TEST,会在生成的工程中默认添加基本使用示例。
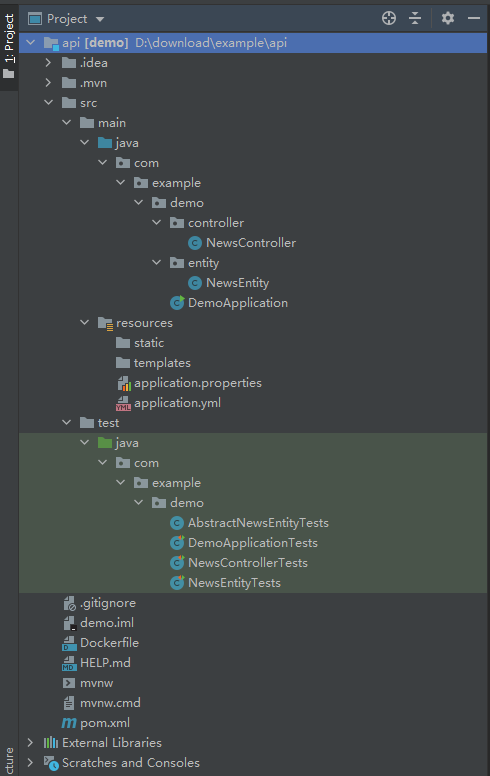
这里选择Fly Framwork模板工程,配置调整完成后,点击下载压缩包到本地,解压即能得到我们所需的初始后端工程api,使用准备好的IDE打开api,工程结构如图:
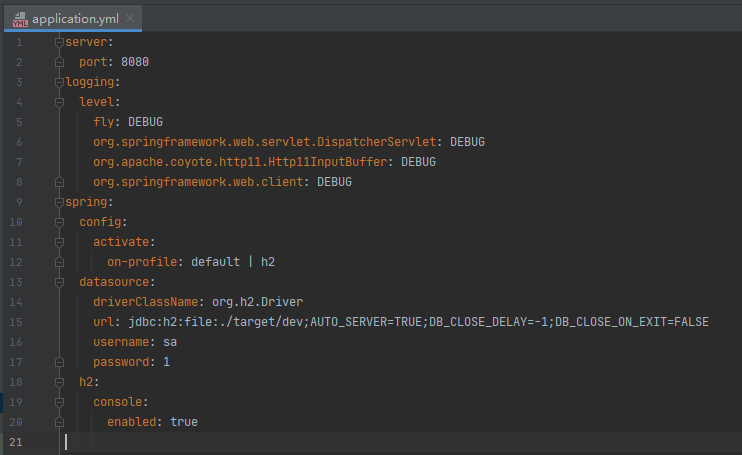
因选择了h2依赖,在src/main/resources/application.yml中,可以看到有包含h2数据源的默认配置,在后续的开发API工程示例中,涉及数据访问,因此必须配置Spring数据源:
使用IDE启动SpringBootApplication,或在工程主目录下执行命令(注意检查pom.xml中的<java.version>):
mvn spring-boot:run
# 开发 API 工程
创建初始工程后,接下来将介绍Fly如何定义实体、根据实体定义进行数据表查询,以及通过实现interface快速生成该表的CRUD API等。
fly-orm模块基于spring-jdbc的JdbcTemplate进行拓展,里面提供了基于对象关系映射设计的数据访问功能,Maven依赖如下:
<dependency>
    <groupId>cn.openfuse</groupId>
    <artifactId>fly-orm</artifactId>
    <version>${fly.version}</version>
</dependency>
fly-orm模块间接引入了fly-data模块,扫描及解析实体类。
# 创建实体
在工程src/main/java,与DemoApplication.java同级目录下创建一个类,用于定义实体:
.../entity/NewsEntity.java
import fly.core.data.annotation.Column;
import fly.core.data.annotation.CreatedAt;
import fly.core.data.annotation.Entity;
import fly.core.data.annotation.Filterable;
import fly.core.data.annotation.UUID;
import fly.core.data.annotation.UpdatedAt;
import java.util.Date;

@Entity
public class NewsEntity {

    @UUID
    protected String id;

    @Column
    @Filterable
    protected String title;

    @CreatedAt
    protected Date createdAt;

    @UpdatedAt
    protected Date updatedAt;

    @Column
    protected Boolean isRemoved;

    // get/set

}
在类上添加@Entity注解,表示该类为实体类;类属性添加@UUID、@Column等注解,表示为实体的字段。更多实体定义的使用,可以查看实体定义文档。
示例中定义了一个名为News的实体,默认对应的数据库表名为news,每个为字段的属性对应一个表的列,列名默认为驼峰式属性名转下划线格式。由于fly-orm模块自动开启ddl(数据库管理),添加实体类后在工程下次启动时,会在配置的数据源中检查并创建表和列。
# 数据访问
现已有News实体,添加单元测试试用通过实体进行数据访问,除了需要fly-orm模块外,还需引入fly-test模块:
<dependency>
    <groupId>cn.openfuse</groupId>
    <artifactId>fly-test</artifactId>
    <version>${fly.version}</version>
    <scope>test</scope>
</dependency>
在src/test/java下创建AbstractNewsEntityTests.java:
import com.example.demo.entity.NewsEntity;
import fly.orm.dao.Dao;
import fly.test.assertj.Assertions2;
import org.junit.jupiter.api.BeforeEach;
import org.springframework.beans.factory.annotation.Autowired;
import org.springframework.boot.test.context.SpringBootTest;

@SpringBootTest(webEnvironment = SpringBootTest.WebEnvironment.DEFINED_PORT)
public class AbstractNewsEntityTests extends Assertions2 {

    @Autowired
    protected Dao dao;

    /**
     * Delete all data before each test.
     */
    @BeforeEach
    public void beforeEach() {
        dao.careful().deleteAll(NewsEntity.class);
    }

}
NewsEntityTests.java
import com.example.demo.entity.NewsEntity;
import org.junit.jupiter.api.Test;

import java.util.List;

/**
 * Tests for {@link com.example.demo.entity.NewsEntity}.
 */
public class NewsEntityTests extends AbstractNewsEntityTests {

    @Test
    public void testCrudByDao() {
        NewsEntity news = new NewsEntity("News information");
        dao.insert(news);
        assertNotEmpty(news.getId());

        news.setTitle("A good news from Peter");
        dao.update(news);

        NewsEntity found = dao.mustFind(NewsEntity.class, news.getId());
        assertEquals(news.getTitle(), found.getTitle());

        List<NewsEntity> list = dao.createQuery(NewsEntity.class).filter("title", found.getTitle()).list();
        assertSize(list, 1);

        dao.mustDelete(NewsEntity.class, news.getId());
    }

    @Test
    public void testSQLByDao() {
        List<NewsEntity> list = dao.createSQLQuery("SELECT #id, #createdAt FROM [News]", NewsEntity.class).list();
        assertEmpty(list);

        int affected = dao.executeUpdate("DELETE FROM [News]");
        assertEquals(affected, 0);
    }

}
实体的数据访问,主要通过fly.orm.dao.Dao接口实现,可以注入使用。
testCrudByDao()中举例了基于实体的增删改查基础操作。在执行方法时指定实体类,会根据实体配置,如实体表名映射、字段列名映射生成SQL。
testSQLByDao()中使用了SQL模板,通过一定的语法,自动进行实体名、字段名转换。需要注意的是,SQL为更新、插入或者删除,都属于数据库的更新,都使用executeUpdate方法。
参考日志(logging.level.fly: DEBUG):
// dao.insert(news);
INSERT INTO news (id, title, created_at, updated_at) VALUES (?, ?, ?, ?)
Args: ['7fc9c4de-c20a-4ff7-b06b-23c587d2c5bb','News information','Thu Apr 07 13:32:55 CST 2022','Thu Apr 07 13:32:55 CST 2022']
1 rows affected

// dao.update(news);
UPDATE news SET title=?, updated_at=? WHERE id=?
Args: ['A good news from Peter','Thu Apr 07 13:32:55 CST 2022','7fc9c4de-c20a-4ff7-b06b-23c587d2c5bb']
1 rows affected

// dao.mustFind(NewsEntity.class, news.getId());
SELECT id, title, created_at, updated_at FROM news WHERE id=?
Args: ['7fc9c4de-c20a-4ff7-b06b-23c587d2c5bb']
record found

// dao.createQuery(NewsEntity.class).filter("title", found.getTitle()).list();
SELECT t.id, t.title, t.created_at, t.updated_at FROM news t WHERE t.title = ?
Args: ['A good news from Peter']
1 rows fetched

// dao.mustDelete(NewsEntity.class, news.getId());
DELETE FROM news WHERE id=?
Args: ['7fc9c4de-c20a-4ff7-b06b-23c587d2c5bb']
1 rows affected

// dao.createSQLQuery("SELECT #id, #createdAt FROM [News]", NewsEntity.class).list();
SELECT id, created_at FROM news
Args: []
0 rows fetched

// dao.executeUpdate("DELETE FROM [News]");
DELETE FROM news
Args: []
从日志中的rows affected可看出执行操作返回或影响的数据量。
更多使用见数据访问文档。
# CRUD APIs
fly-rest是为REST架构设计的模块,结合实体模型配置,能够快速开发符合RESTful风格的API,通过Controller实现接口快速生成对应实体的CRUD接口。
在pom.xml中引入依赖:
<dependency>
    <groupId>cn.openfuse</groupId>
    <artifactId>fly-rest</artifactId>
    <version>${fly.version}</version>
</dependency>
在工程src/main/java与Application同级目录下创建一个Controller:
.../controller/NewsController.java
import com.example.demo.entity.NewsEntity;
import fly.core.data.model.Partial;
import fly.data.common.query.Filters;
import fly.data.common.query.Query;
import fly.rest.data.annotation.Crud;
import fly.rest.data.crud.CrudContext;
import fly.rest.data.crud.operation.*;
import org.springframework.web.bind.annotation.GetMapping;
import org.springframework.web.bind.annotation.PathVariable;
import org.springframework.web.bind.annotation.RequestMapping;
import org.springframework.web.bind.annotation.RestController;

/**
 * Included APIs:
 * - GET /news - {@link FlexibleCrudQuery#query(CrudContext, Query)}
 * - GET /news/exists - {@link CrudExists#exists(CrudContext, Filters)}
 * - POST /news - {@link FlexibleCrudCreate#create(CrudContext, Partial)}
 * - GET /news/{id} - {@link FlexibleCrudFind#createFindQuery(CrudContext)}
 * - PATCH /news/{id} - {@link CrudUpdate#update(CrudContext, Partial)}
 * - DELETE /news/{id} - {@link CrudDelete#delete(CrudContext)}
 * - GET /example/{name} - {@link #example(String)}
 */
@RestController
@RequestMapping("/news")
@Crud(entityClass = NewsEntity.class)
public class NewsController implements FlexibleCrudQuery, CrudExists, FlexibleCrudCreate, FlexibleCrudFind, CrudUpdate,
        CrudDelete {

    public static final String HELLO_WORLD = "Hello World! ";

    /**
     * Example custom method.
     */
    @GetMapping("/example/{name}")
    public String example(@PathVariable("name") String name) {
        return HELLO_WORLD + name;
    }

}
快速生成对应实体的CRUD API,主要分为两步:
在
Controller类上添加@Crud注解指定实体类;实现示例中框架提供的
CRUD接口。
如示例类中实现的FlexibleCrudQuery接口,会在Controller类的@RequestMapping("/news")路径上再生成GET接口,即最终生成的接口为GET /news。
从示例类注解中总览Controller包含的API,重启工程,可以使用Postman等工具测试接口是否可用,或编写单元测试调试。
为了可视单元测试请求日志,在application.yml中增加以下配置:
logging:
  level:
    "org.springframework.web.client": DEBUG # 输出请求类型、完整路径及参数
    org.apache.coyote.http11.Http11InputBuffer: DEBUG # 包括请求头等
    "org.springframework.web.servlet.DispatcherServlet": DEBUG # 包括请求耗时等
在src/test/java下创建NewsControllerTests.java:
import com.example.demo.controller.NewsController;
import com.example.demo.entity.NewsEntity;
import fly.lang.New;
import fly.test.rest.client.TRestResource;
import fly.test.rest.client.TRestTemplate;
import fly.test.rest.client.model.TQuery;
import org.junit.jupiter.api.Test;
import org.springframework.beans.factory.annotation.Autowired;

import javax.annotation.PostConstruct;
import java.util.List;

/**
 * Tests for {@link com.example.demo.controller.NewsController}.
 */
public class NewsControllerTests extends AbstractNewsEntityTests {

    @Autowired
    protected TRestTemplate rest;

    private static TRestResource news;

    @PostConstruct
    protected void postInit() {
        news = rest.resource("news");
    }

    @Test
    public void testExample() {
        String name = "Fly";
        TRestTemplate template = news.rest("/example/{name}");
        String result = template.getFor200("", name);
        assertEquals(NewsController.HELLO_WORLD + name, result);
    }

    @Test
    public void testCrudByRest() {
        NewsEntity created = news.createFor200(New.hashMap("title", "News Information"), NewsEntity.class);
        assertNotEmpty(created.getId());

        news.patchUpdate(created.getId(), New.hashMap("title", "A good news from Peter"));

        NewsEntity found = news.find(NewsEntity.class, created.getId());
        assertEquals("A good news from Peter", found.getTitle());

        List<NewsEntity> list = news.queryList(NewsEntity.class, new TQuery().filter("title", "A good news from Peter"));
        assertSize(list, 1);

        news.delete(created.getId());
    }

}
模块提供的测试请求类简化了很多如拼接请求路径、返回数据格式转换等操作流程。运行testCrudByRest()单元测试方法,能在IDE控制台中看到实际发送的请求信息:
...RestTemplate              : HTTP POST http://localhost:8080/news
...RestTemplate              : Accept=[application/json, application/*+json]
...RestTemplate              : Writing [{title=News Information}] with org.springframework.http.converter.json.MappingJackson2HttpMessageConverter

...
# 查看 API 文档
现已有News实体相关API,引入springdoc依赖,可以输出API文档:
<dependency>
    <groupId>cn.openfuse</groupId>
    <artifactId>fly-starter-rest-springdoc</artifactId>
    <version>${fly.version}</version>
</dependency>
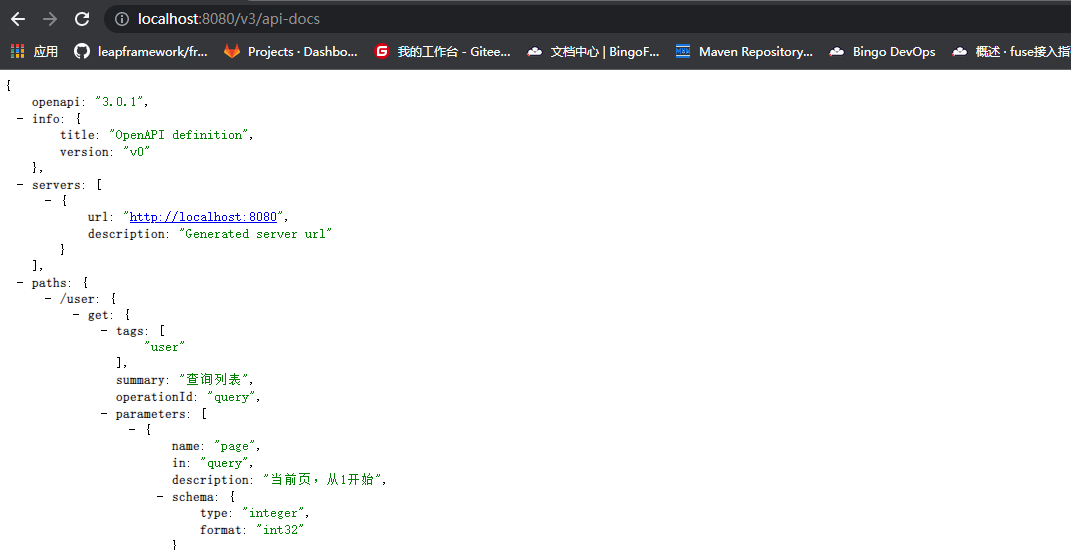
访问http://localhost:8080/v3/api-docs (opens new window)查看OpenAPI Json(图片仅作参考):
引入swaggerui依赖,可视化API资源:
<dependency>
    <groupId>cn.openfuse</groupId>
    <artifactId>fly-starter-rest-swaggerui</artifactId>
    <version>${fly.version}</version>
</dependency>
访问http://localhost:8080/swagger-ui.html (opens new window)(图片仅作参考):
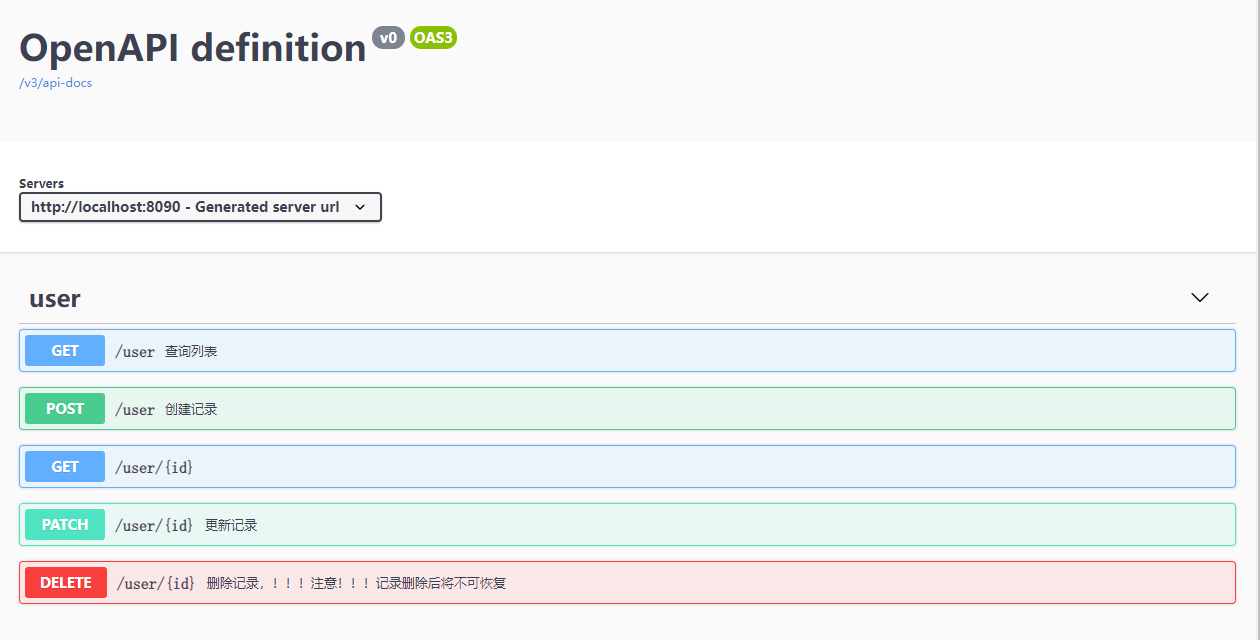
更多文档使用配置,可见API 文档。