# OAuth2 接入
fly-security模块基于Spring Security,通过简单配置接入符合标准的OAuth2授权服务器,提供更多拓展功能,如本地token缓存等。
# 依赖引入
需要在工程中引入下列依赖:
pom.xml
<dependency>
    <groupId>cn.openfuse</groupId>
    <artifactId>fly-security</artifactId>
    <version>${fly.version}</version>
</dependency>
<dependency>
    <groupId>org.springframework.boot</groupId>
    <artifactId>spring-boot-starter-oauth2-client</artifactId>
</dependency>
<dependency>
    <groupId>org.springframework.boot</groupId>
    <artifactId>spring-boot-starter-oauth2-resource-server</artifactId>
</dependency>
若工程原本已使用fly-rest模块,可以直接引入fly-starter-rest-oauth2,该starter已包含上列依赖。
# OAuth2 配置
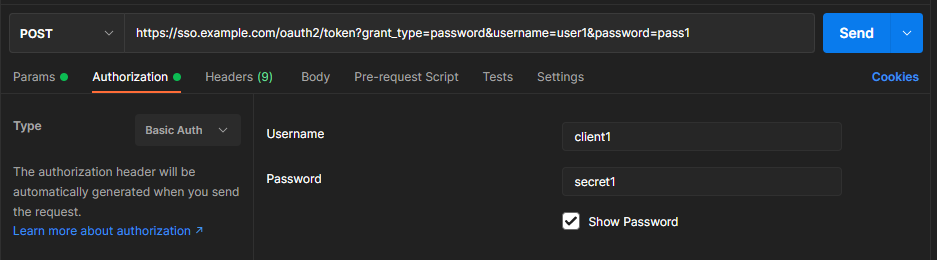
具体配置类为fly.security.oauth2.OAuth2SecurityProperties。设已准备的授权服务器根地址及客户端如下:
- 服务器根地址:
https://sso.example.com clientId:client1clientSecret:secret1- 登录测试账号:
user1/pass1
application.yml
# OAuth2 配置
oauth2:
  server-url: 'https://sso.example.com'
  client-id: 'client1'
  client-secret: 'secret1'

# fly-security 模块提供的默认配置,这里列出作参考;
# 使用默认配置中定义的别名 oauth2.*(如上)来配置 OAuth2,好处是若使用 fly-test 模块进行单元测试,会直接使用同一 OAuth2 配置
fly:
  security:
    oauth2:
      # OAuth2 基础配置,必填
      server-url: "${oauth2.server-url:}"
      client-id: "${oauth2.client-id:}"
      client-secret: "${oauth2.client-secret:}"
      # 可选配置,部分配置根据标准已设有默认值
      # 当请求未携带有效 token 自动跳转到授权服务器登录,开启后需要配置 base-redirect-uri
      login: "${oauth2.login:false}"
      # 开启跳转登录后登录成功重定向地址
      base-redirect-uri: "${oauth2.base-redirect-uri:}"
      authorization-uri: "${oauth2.authorization-uri:/oauth2/authorize}"
      token-uri: "${oauth2.token-uri:/oauth2/token}"
      introspection-uri: "${oauth2.introspection-uri:/oauth2/introspect}"

# 其他配置,拓展功能。配置对应的值为默认值
fly:
  security:
    oauth2:
      # 从授权服务器中获取用户信息的 uri
      user-info-uri: "/oauth2/userinfo"
      # 在获取用户信息后,从指定属性名中取用户名
      user-name-attribute: "name"
      # 是否允许从请求的 parameters 中获取 access_token 进行校验,优先级请求头较高
      allow-access-token-parameter: true
      # token 缓存配置
      token-caching:
        enabled: true # 是否开启
        max-size: 1000 # 缓存大小
        expires-in: 600 # 过期时间(s)
# 应用&验证
在工程主启动类上,添加@EnableWebSecurity注解:
import org.springframework.boot.SpringApplication;
import org.springframework.boot.autoconfigure.SpringBootApplication;
import org.springframework.security.config.annotation.web.configuration.EnableWebSecurity;

@SpringBootApplication
@EnableWebSecurity
public class DemoApplication {

	public static void main(String[] args) {
		SpringApplication.run(DemoApplication.class, args);
	}

}
启动工程,工程根地址为http://localhost:8080,此时不带token请求返回401。可通过以下方式从授权服务器生成一个access_token:
在请求头中加上Authorization: Bearer {access_token}(如开启了fly.security.oauth2.allow-access-token-parameter,可以直接添加Query String Parameters:http://localhost:8080?access_token={access_token})。
携带生成的access_token重新请求,此时不再返回401。