# 扩展交互动作
平台内置了一些常用的交互动作,包括页面、数据、通知提醒以及组件相关的原子型动作,使得我们在给组件添加交互的时候,能够自由的组合。 某些情况下这些原子交互动作无法满足的时候,或者考虑更高层次的复用的时候就会想着通过扩展交互动作的方式来实现。 接下来演示如何将加密这个动作封装成原子动作。
# 扩展交互动作
- 在
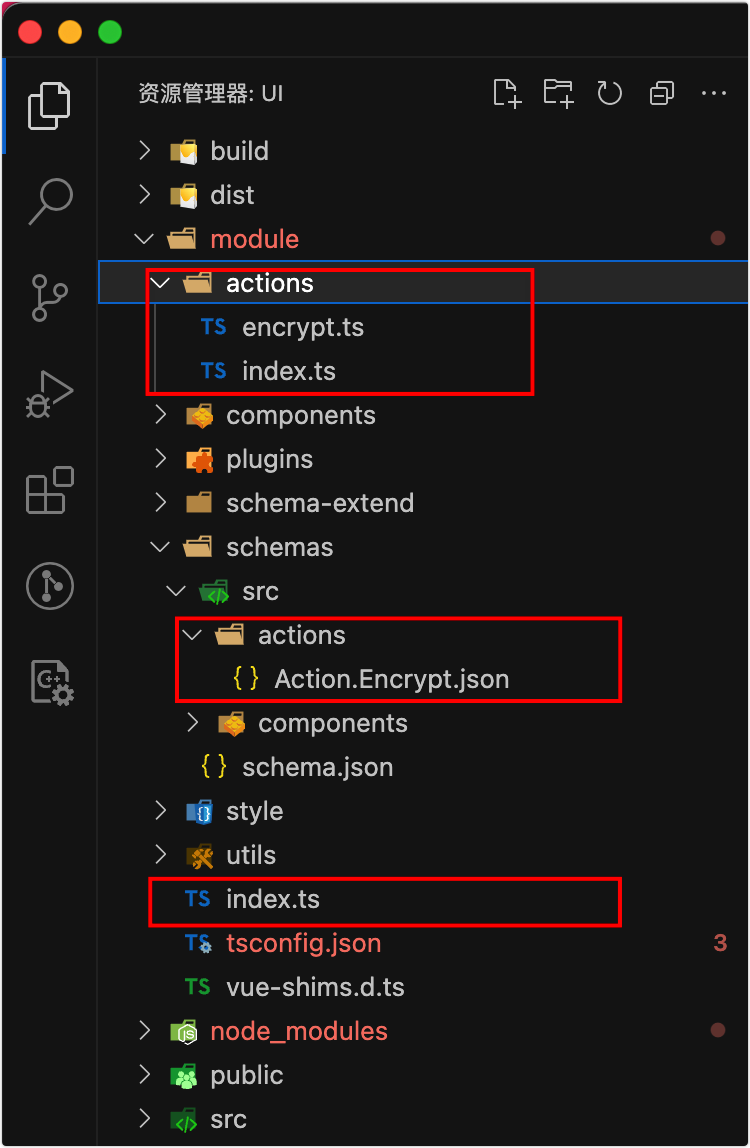
ui/module/actions里面添加 encrypt.ts 和 index.ts 文件(如无actions文件夹,请先创建)
encrypt.ts
import { ActionContext, ActionResult } from 'maple-client-orchestration-runtime'
import sha256 from 'crypto-js/sha256'

export default {
  id: 'Action.Encrypt',
  func: async (actionContext: ActionContext) => {
    // 获取来自属性里面的数据
    // Action.Encrypt.json 里面定义的properties,其中包含了message,encryptResult
    let { message, encryptResult } = actionContext.action.inputs

    // 实现加密逻辑
    const encryptStr = sha256(message).toString()
    console.log(encryptStr)

    // 返回结果
    const actionResult: ActionResult = {
      data: encryptStr
    }
    //设置了编排结果变量resultName,则设置数据到编排变量resultName中
    if (encryptResult) {
      actionContext.setVariable(encryptResult, actionResult.data)
    }
    return actionResult
  }
}
index.ts
import encrypt from './encrypt'
import { ClientNodeRegistry, ClientNodeSchema } from 'maple-client-orchestration-runtime'
import _ from 'lodash'

// 将所有扩展的action添加进来
const actionNodes = [encrypt]

// 注册交互编排节点
export async function registerActions(filter?: (node: ClientNodeSchema) => boolean) {
  let _nodes: ClientNodeSchema[] = actionNodes
  if (filter) {
    _nodes = _.filter(_nodes, filter)
  }
  ClientNodeRegistry.batchRegister(_nodes)
}
- 在
ui/module/index.ts中进行注册
import { AsyncModuleRegistry } from '@fly-vue/loader'
const moduleDef = AsyncModuleRegistry.find(process.env.VUE_APP_NAME)
// eslint-disable-next-line no-undef
__webpack_public_path__ = moduleDef && moduleDef.publicPath
import {
  IWebModule,
  WebApplicationEventType,
  webApplication
} from '@fly-vue/core'
import { extendSchema } from './schema-extend'
import { registerPlugins } from './plugins'
import { registerActions } from './actions' // 引入注册函数 =========
import components from './components'
import './style/index.css'

const _module: IWebModule = {
  dependencies: ['@fly-vue/core'],
  name: process.env.VUE_APP_NAME,
  version: process.env.VUE_APP_VERSION,
  components: components as any,
  install: function () {
    webApplication.registerEvent(
      WebApplicationEventType.moduleInstalled,
      async () => {
        await extendSchema()
        await registerPlugins()
        await registerActions()  // 添加注册代码 =========
      },
      process.env.VUE_APP_NAME
    )
  }
}

webApplication.addModule(_module)

export default _module
# 编写 Schema
- 在
ui/module/schemas/src/actions里面添加 Action.Encrypt.json 文件,用于编写定义。
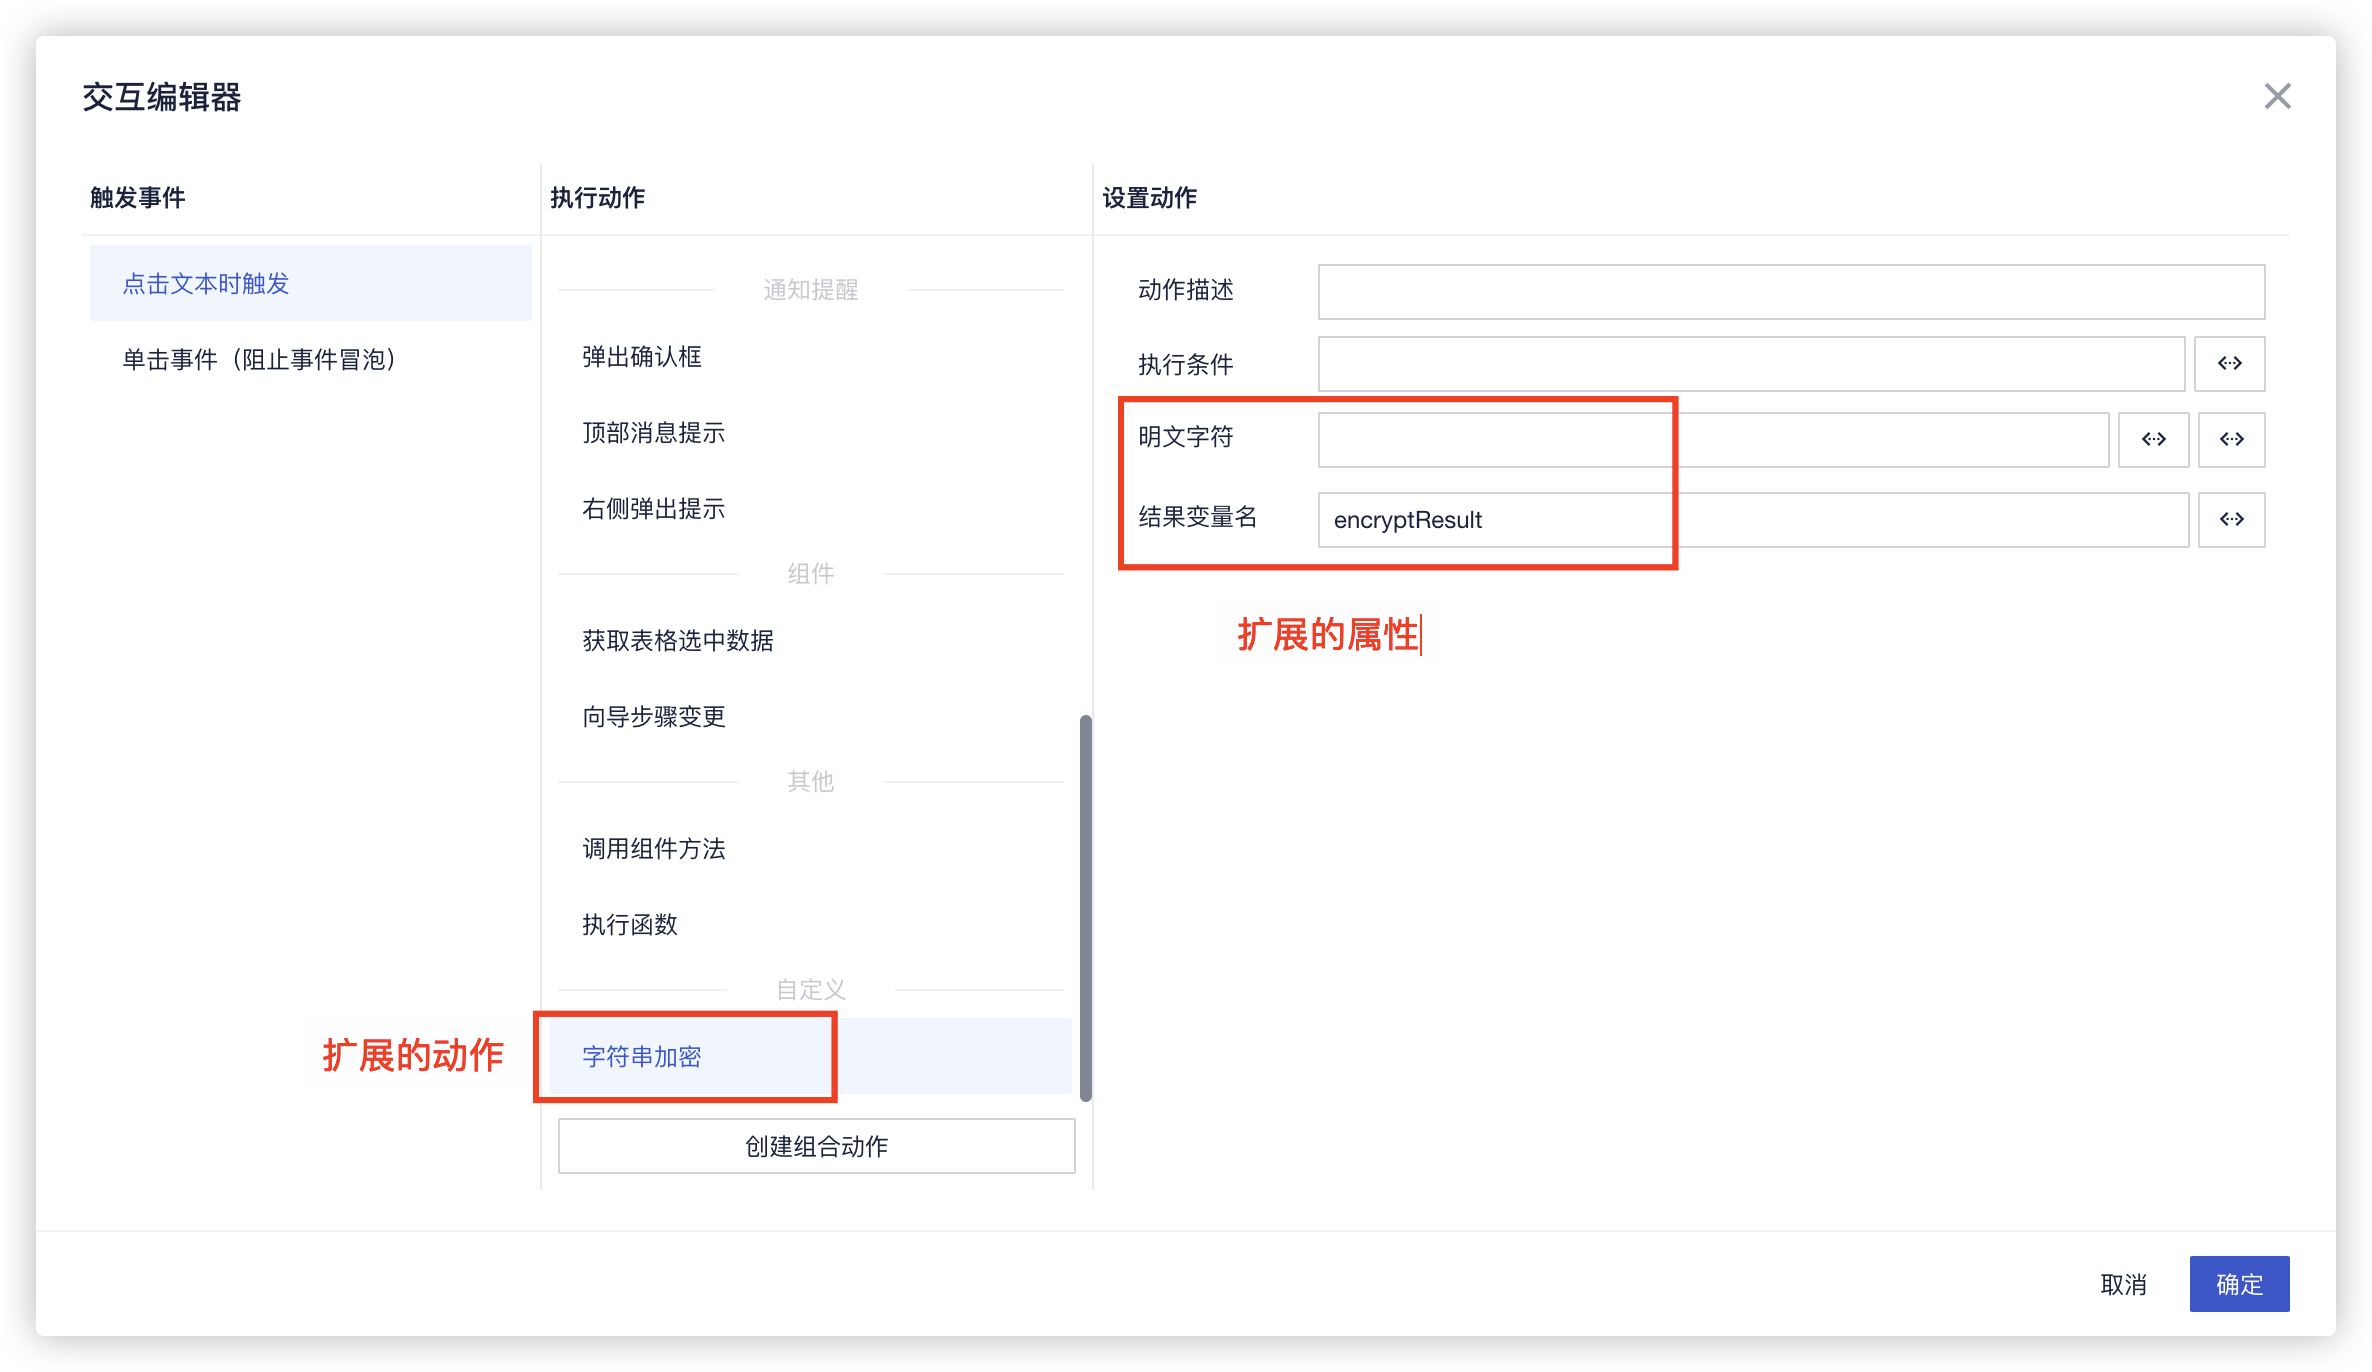
{
    "defType": "action",
    "orderNo": 1000,
    "group": "自定义",
    "title": "字符串加密",
    "properties": {
      "message": {
        "type": "string",
        "title": "明文字符",
        "default": "",
        "inputType": "VarInput"
      },
      "encryptResult": {
        "type": "string",
        "title": "结果变量名",
        "default": "encryptResult",
        "description": ""
      }
    },
    "output": {
      "[encryptResult]": {
        "type": "string",
        "title": "执行结果"
      }
    }
  }
- 编译生成 Schema
在 ui 工程的根目录下,执行 npm run schema ,此命令将会合并生成一份整体的描述文件 ui/module/schemas/schema.json ,最后运行阶段被程序加载。
package.json 中定义了该命令,如果缺少请先补上。
{
    "scripts": {
        "schema": "fly-schema-generator ./module/schemas/src > ./module/schemas/schema.json",
    }
}
# 目录结构
下图是最新工程模版的结构,旧模版工程,只需要调整红框的部分即可。
# 编译生成
执行 build-ui.sh 或者 build-ui.bat 进行编译。 编译成功后,重启服务即可。
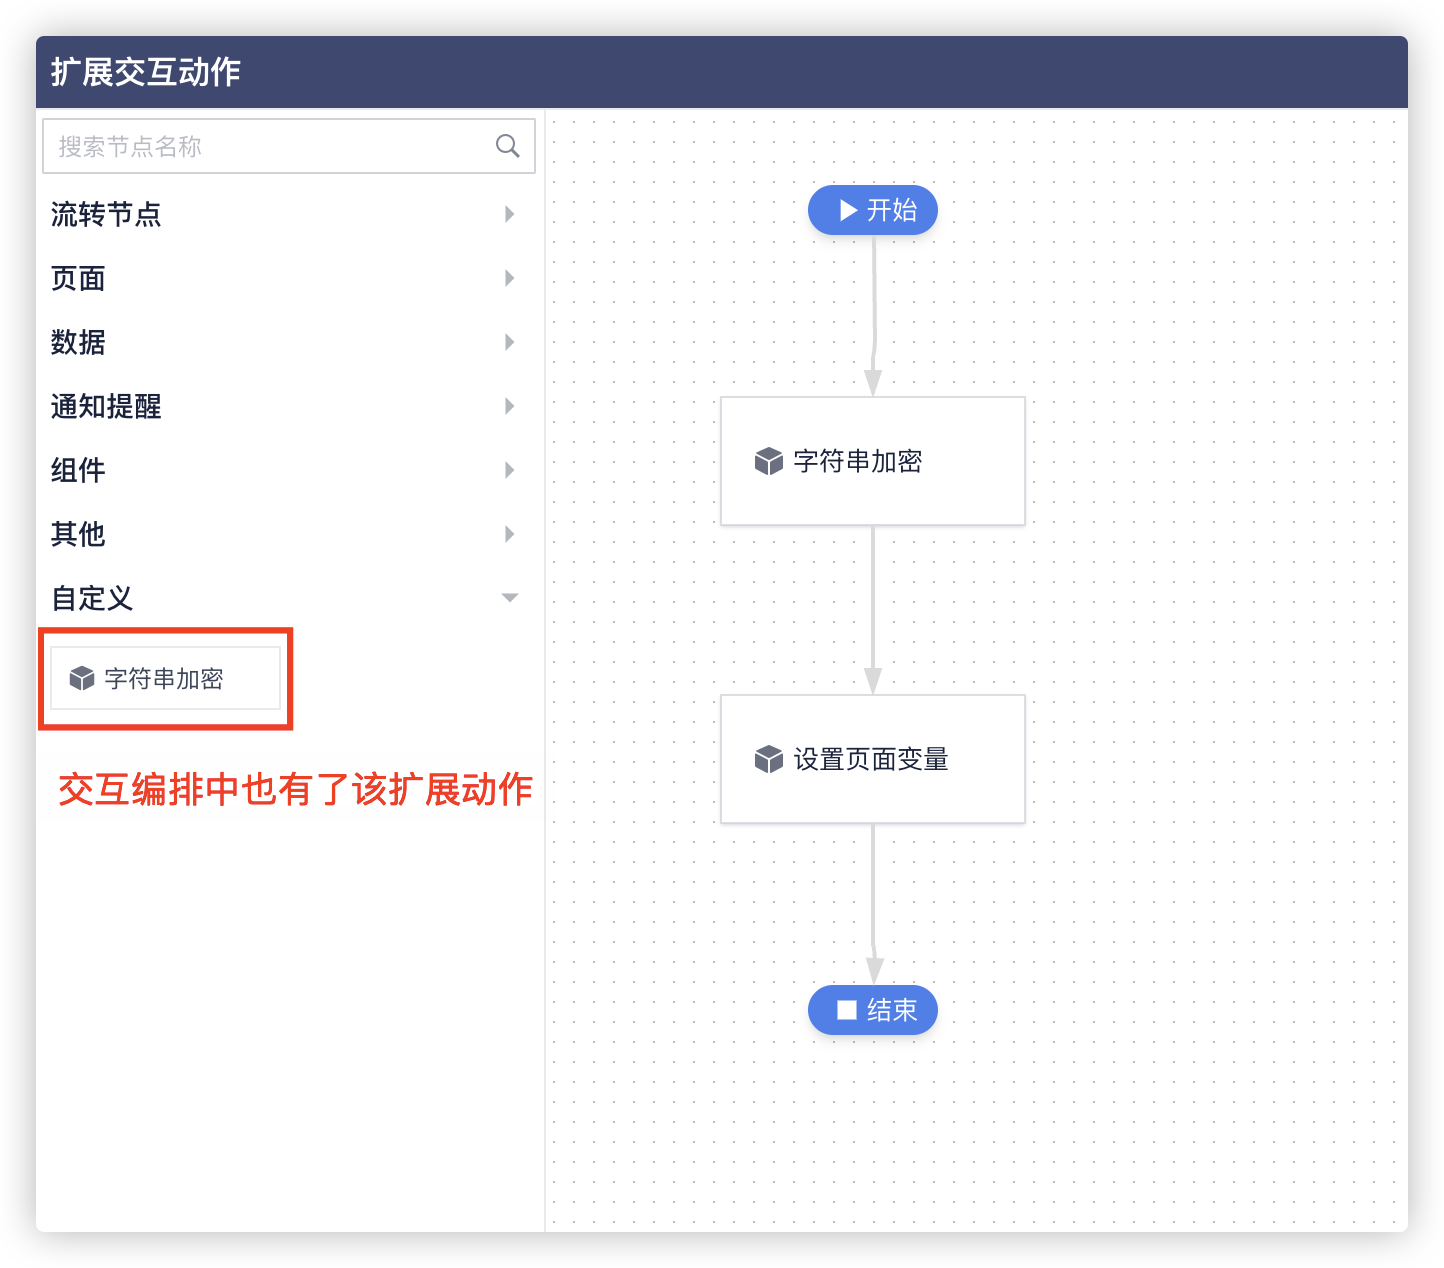
# 查看效果
# 注意事项
- 假如需要将该节点的结果传递下去, 需要定义
output,也就是上面的 结果变量名;(查看 Action.Encrypt.json文件 )